Sunday, November 4, 2012

Safety First - Building a NASA Rally Spec Cage

One of the driving forces behind building the OLC2 (vs upgrading the '67) was the desire to make the transition from a street car that is driven on the track to a true track capable car that happens to be street legal.  In the four years since the OneLapCamaro was finished we have been fortunate to have been able to participate in a variety of unique and challenging events... but there were several which necessitated more safety equipment than we had in the '67.   Hopefully the OLC2 will address those needs with a comprehensive roll cage, fire system, and full selection of safety equipment.

When it came time to build a roll cage the question we had to answer was"what rule set should it be built to?"  

The Tire Rack One Lap of America has no rules but some of the other events that we want to run - The Silver State Classic Challenge, Targa Newfoundland, and the Chihuahua Express - have explicit but not necessarily consistent guidelines.  Ultimately we chose to build the cage to the most stringent - and logical - rule set we could find:  NASA Rally Sport.  It meets or exceeds most all road course rule sets and essentially follows FIA guidelines.  Going this route means that the OLC2 will not only have a cage that we can be confident in but also that we will (we should) qualify for a Log Book as an Open 2WD Heavy car under Rally Sport rules.  

The NASA Rally Sport roll cage rules break the construction in to seven required elements with options for each provided within the rule set.  Follow along with our design...


Required Element 1 - Main Roll Cage Structure & Backstays 

Design 253-3:  One piece main hoop, two forward bars tied across the top of the windshield and two straight rear backstays.


while not part of Element 1 we added a bar behind the dash that will tie forward and support the pedal block.


the front bars in to the engine compartment are also not part of Element 1 but we wanted to position them as our work on the front continued.  These bars may cause some issues with RS compliance as some groups prefer to see more crumple zone in front of the suspension but we should be OK.


With the main cage framework in place we mocked up some of the future elements


Required Element 2 - Roof Bars
Required Element 3 - Backstay Diagonals

The design for Element 2 and Element 3 ultimately tie in to one another.  We chose 253-14 for the roof bars which dictates 253-22 for the backstay diagonals.  Essentially these two elements consist of two "V" shapes which meet at the top of the rear main hoop.


This first attempt at the backstay diagonals was quickly scrapped as the diagonals did not end in the proper position.  In me mean time work commenced on the next element


Required Element 4 - Main Hoop Diagonal Members 

Design 253-7 - an X across the hoop with a separate harness bar that will be behind the X


Backstay diagonals are now in the proper position terminating within 3" of the backstays


Required Element 5 - Sill bars 

Required Element 7 - Door Bars 


This design ultimately results in three door bars - one horizontal bar parallel to the sill and two bars making an X across the door entry.  This design is a variation of 253-9 which uses two shallow U shaped bars which meet in the middle.


which also includes

Required Element 6 - A-pillar reinforcement 

also known as an FIA bar.


Looks almost like a '67 with a vent window...


All of the elements are coming together now...


And will all of the required elements in place we added the required gussets - in this case we chose to use "Taco Gussets"


We chose to add some additional protection for the foot wells and will now begin welding everything together...

stay tuned!


Wednesday, July 18, 2012

GM Performance Parts LSA

When it came time to figure out a powerplant for the OLC2 we knew that the new GM Performance Parts line of LS based engines was the logical choice.  The LS7 in the OneLapCamaro had been a great foundation for the '67 but for the '69 we knew that we needed more power.  The solution was the LSA Engine from GM Performance Parts.

With over 550 HP on tap stock and more than capable of making 700+ with some simple tweaks it was definitely the way to go.  For our purposes it was more than just a simple installation.  We wanted to set the engine back 5+ inches to give us a little bit better weight distribution.  That was about the max we could work with the SpeedTech Subframe and Torque Arm and going back that far required some serious reworking of the firewall.

We started by gutting the stock dash and cleaning up the cowl.


I would be lying if I told you that I knew why the decision was made to completely remove the cowl; unfortunately it was done before I knew it.  Now I tell myself that we're saving some weight while, in reality, I know that it's going to be a monumental PITA in the future.


But at this point it's too late to fuss over bad decisions.  All I can suggest say is "don't try this at home."

The Supercharged GMPP LSA is will be by Tremec's T-56 Magnum - the aftermarket version of the OEM TR-6060.  Rated for 700 ft.lbs. of torque it should be ideal for the OLC2.


A quicktime bellhousing is more compact and lighter than the McLeod piece we used on the OLC.


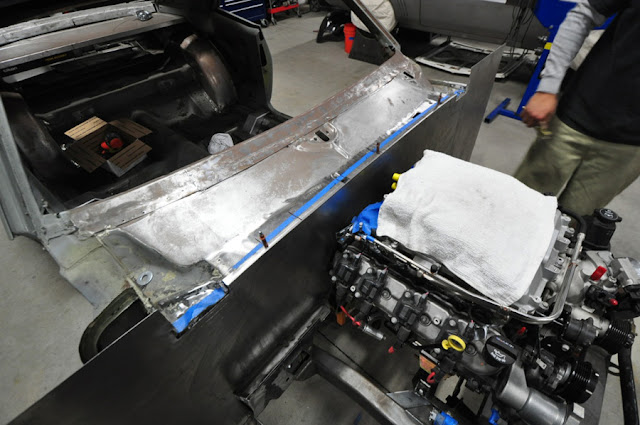
Locating the LSA back from it "stock" position required making some room in the firewall to get the lay of the land...


Back almost 5" from it's "stock" location the LSA needs some help around the firewall and at the subframe.


As always, there is more than one way to skin a cat.  I would consider this, in hindsight, to be the wrong way.  Too much time, labour, and headache to justify.  Once again... live and learn...

After some discussion the decision was made to remove the old firewall and replace it in it's entirety...


We began by removing the old firewall and started its replacement with a flat sheet of metal...


Getting a flat plane far enough back meant removing the factory "tulips" and cutting in to the structure


To give the new firewall some stability a bit of work was put in with a bead roller...


Before the flat panel was curved to replace the now missing tulips


Our LSA looks right at home with the very tidy firewall...


Repositioning the firewall meant repositioning the fender mounts as well - you can see that we're about 2" further back with the new firewall...


The engine setback also required some new clearances be made for accessories...


With some finish work the new firewall looks like it could have been like that way from the factory


To ensure that the LSA could make every bit of horsepower we went with a custom set of Stainless Works headers from SpeedTech.  With 1 7/8" tube they were only available unassembled...  Ironworks created a jig and welded them up in house...


 We're well on our way now...

Next up - the Roll Cage!